Build guides · Seating
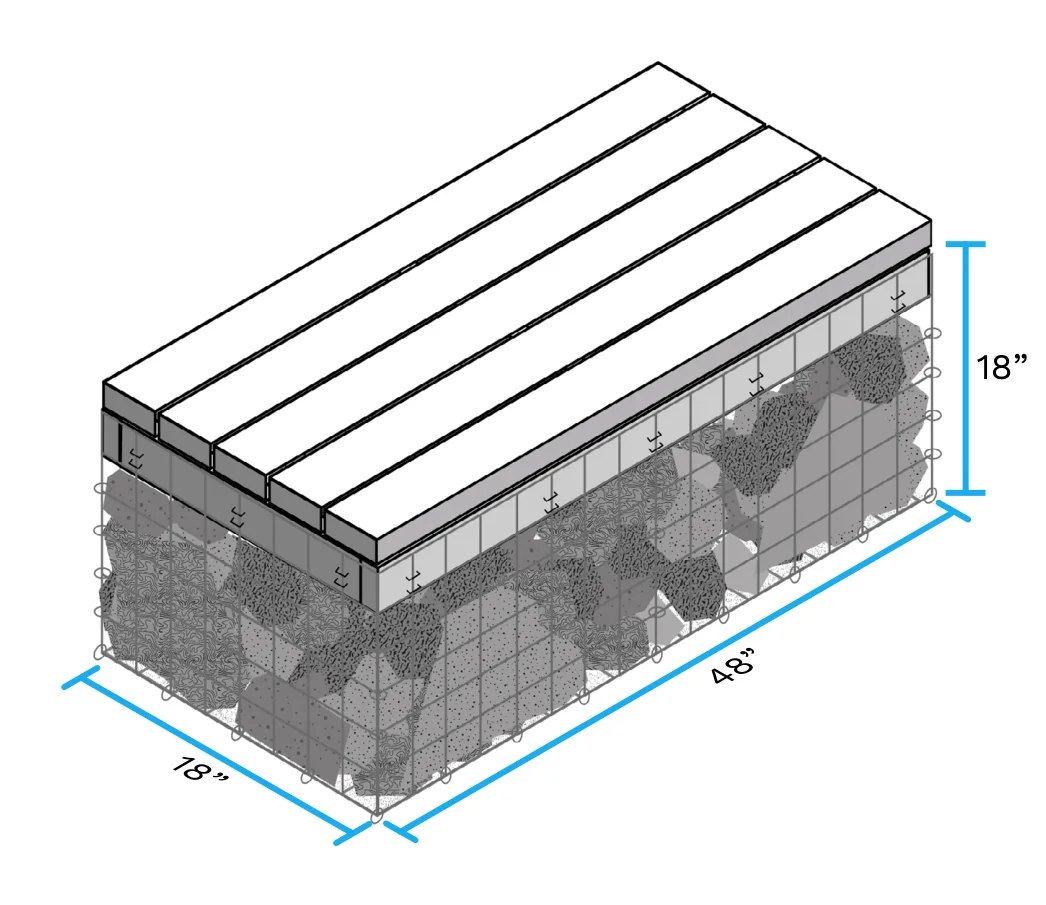
4' Wood-Topped Gabion Bench
A 4-foot wire gabion basket filled with stone and topped with a 2x4 wood seat — built and filled on site, or off site and filled last.
- Size
- 4' L × 1'-6" W × 1'-6" H
Built from these parts it comes out about 19½″ tall. The 2x4 top boards (1.5") sit on the wood frame, whose top edge is flush with the top of the 18" mesh sides, so the bench is 19.5" tall. The PDF's cover gives 18" for the overall height, which its own parts don't add up to.
What you need
Before you begin
- These are DIY recommendations only — tailor the material, assembly and construction to your own project and site.
- Building this assumes some working knowledge of hand and power tools, hardware, fasteners, lumber and basic assembly technique.
- Before using any power equipment, review and follow the manufacturer's safety requirements, and don't let anyone use power tools who hasn't done the same.
- You (the owner) are responsible for any building and safety codes, permits and regulatory approvals this needs.
- Clear the site of trash, hazards and unwanted structures first, and identify any utilities that could interfere before you dig.
- Everyone helping build should sign a volunteer waiver.
- Cut wire mesh and gabion fill can leave sharp edges — wear gloves and safety goggles, and buff any sharp wire with a grinder.
Cut list
| Part | Qty | Stock | Length | Notes |
|---|---|---|---|---|
| GB-1 | 3 | 2x4 | 15" | Gabion bench frame |
| GB-2 | 7 | 2x4 | 48" | Gabion bench top + frame |
| 18-4a | 1 | 2x2 welded-wire mesh | 48" | Gabion bottom panel, 48" x 18" |
| 18-4b | 2 | 2x2 welded-wire mesh | 48" | Gabion side (long), 48" x 18" each |
| 18-4c | 2 | 2x2 welded-wire mesh | 18" | Gabion side (short), 18" x 18" each |
Steps
Mark, label and cut the lumber and wire mesh
Mark, label and cut lumber in order of GB-1 to GB-2 to the lengths in the cut list.
Sort your 2x2 wire mesh into equal-sized piles and label them 18-4a (gabion bottom), 18-4b (gabion side, long) and 18-4c (gabion side, short).
- Label each piece of lumber as you measure and cut it.
- Keep a separate pile of lumber for GB-1 and GB-2.
- Lightly sanding the cut edges removes splinters and helps with assembly.
- Building more than one gabion? A stop block on your miter saw keeps every piece the same length.
Staple the wire mesh sides to the frame ends
Place two GB-2 pieces and two GB-1 pieces on a flat surface, aligning the edges as shown.
Make sure the verticals on the gabion wire mesh are touching the wood, and the cross pieces (smooth edges) that run the same way as the board are on the outside, to keep sharp edges off the outside of the gabion.
Center the two 18-4c wire mesh pieces on the GB-1 piece of wood — there should be 1.5" from the edge of the wood to the edge of the wire mesh.
Secure the two 18-4c and two 18-4b wire mesh pieces onto the GB-1 and GB-2 lumber using a hammer and 32 1.5" galvanized cable staples — 2 staples per piece of wire.
- If you're connecting many gabions in a row, only staple the metal mesh to one GB-1 piece.
Build the frame
Place two GB-2 pieces on a flat surface. Place two GB-1 pieces in between the GB-2 pieces at either end, aligning the edges as shown.
Use the pre-drilling guide at the end of the packet to pre-drill your screw holes, then secure the GB-2 lumber into the GB-1 pieces with an impact driver and 8 2.5" self-driving exterior wood screws.
- Use a carpenter's square to check each corner forms a right angle.
- If you're connecting many gabions together, leave one end open — see the Build chapter for the layout.
Add the center support
Place one GB-1 piece in the middle of the frame created in step 3.
Secure it with an impact driver and 4 2.5" self-driving exterior wood screws.
Close up the basket's corners
Secure the 2x2 wire sheet — the two 18-4c and two 18-4b pieces — together at the corners using hog rings and hog ring pliers, one hog ring every other opening. Make sure hog rings are at all corners and edges so the basket holds its shape.
Brace the center
In the center of the gabion basket, below the middle GB-1 piece, add bracing material using one of two options: excess end pieces of 2x2 wire mesh cut in half with bolt cutters, or any excess 2x2 mesh that spans the entire width of the basket (at least 2 boxes, or 4"+, tall).
Secure the middle support piece with hog rings.
Close the top
Place the 18-4a wire mesh top piece on top of the gabion basket secured in step 5.
Secure the top piece with hog rings on the four sides and the center brace — one hog ring every other mesh opening, and two at each corner. The gabion basket is now ready to transport to the site.
Set the basket on site
Rotate the gabion basket 180°. Place it on site with a gravel underlay.
Ensure the gabion basket is straight using a level.
- If it's next to other gabions, use string and line levels to keep the row straight.
Fill the basket
Place the gabion in its location per your park's design. Apply gravel underneath to fine-tune adjustments.
Starting with the largest, flattest pieces of gabion fill you have, begin filling the gabion starting at the edges, and continue until you've built up the sides.
Fill the frame with leftover gabion fill until it's level with the top of the wood edge.
- Place fill carefully to avoid warping the basket, and make sure all gaps are filled for stability.
- See your Create workbook, phase four, for more on this step.
Add the wood top and sand
Place two GB-2 pieces on top of the frame created in step 3, using the pre-drilling guide at the end of the packet to pre-drill the wood. Secure the two end boards first with an impact driver and 12 2.5" self-driving exterior wood screws, keeping the edge flush with the wood below.
Equally space the remaining three GB-2 boards between the two end boards and secure with an impact driver and 12 more 2.5" self-driving exterior wood screws.
Lightly sand the rough edges of the gabion bench, and make sure there are no sharp edges of gabion wire — buff with a grinder if any are too sharp.
- Pre-drilling at this step helps the screws not split the boards.
- Keep all screws a thumb's width from the edge of the wood.
Pre-drilling hole guide (template)
Cut out the pre-drilling hole guide along the dotted lines. When drilling, align the edge of the template with the outside edge of the lumber before pre-drilling.
Not all holes are used — not all patterns use the template. Use the assembly steps above for your hole guide. Keep all holes about a thumb's width from the edge (about 1"), even holes that don't use this template.
Finishing
Exterior wood treatment can prolong the life of your park elements, but it isn't necessary — these pieces are built to be low-cost, durable and easy to build by design, so it may be more practical to just let the next generation rebuild them when the time comes. If you do want to stain, paint or seal the wood top, see the finish resources below.
Supplier & resource links
Source: GABION_BENCH_ASSEMBLY instructions, pp. 1–15 (cover; before you begin; common material + lumber selections; steps 1–10; pre-drilling hole guide)